Skinning (Figure 11)
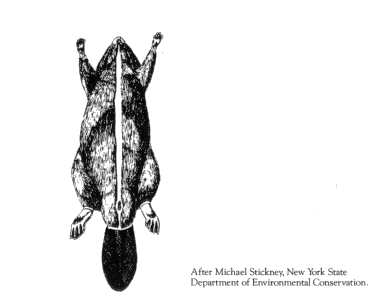
The feet and tail should be removed at the hairline with a small axe or by cutting with a knife to separate the tail vertebrae and leg bones. A cut is then made through the skin from the base of the tail up the belly to the center of the lower lip. Care must be taken to avoid cutting into the muscle tissue and opening up the body cavity. The outer two inches of the pelt are "clean skinned" by cutting away connective tissue and fat from the pelt. The rest of the belly skin is removed by cutting more quickly, leaving more muscle and fat on the pelt ("rough skinning").
With the feet removed, it is easier to skin around the stump ends by pushing them up with the last three fingers while rolling the skin held between the thumb and index finger downward. The beaver can now be rolled on its side and the pelt cut away to the center of the back from neck to tail. The skinned half of the pelt is laid back over the carcass and the beaver is turned around on the skinning table. The other half of the pelt is "rough skinned', in the same manner as the first half. The carcass is then laid on its belly and the pelt lifted and cut away from the base of the tail toward the head. Skinning the head requires several careful cuts around the eyes and ears. The pelt should be hung up and allowed to dry in a cool area. "Rough skinned" beaver pelts can be frozen and thawed out later to be fleshed and dried. The pelts should be folded over, fur side to fur side, and put into individual plastic bags.
The grayish castor glands located directly in front of the anus are used in the perfume and lure industry and are worth saving. They are easily removed by making one cut across the abdomen just above the glands. The glands can be peeled away from connective tissue keeping the connection between the two glands intact and hung over a wire to dry for about 10 days. They are sold by dried weight and can be sold along with the fur.
Figure 11. When skinning beaver properly, you must first remove the feet and tail at the hairline, and then make one cut through the skin from the base of the tail up the belly to the center of the lower lip.
The next step in processing a beaver pelt is to remove all the fat, muscle and connective tissue left from the rough skinning process. The pelt can be fleshed over a rounded and pointed fleshing beam. The fleshing beam is about 5 feet long and is anchored so it forms an angle of approximately 45 degrees between the floor and the chest of the individual doing the fleshing. Fleshing beams can be made quickly from butt end board slabs or 2 x 8 lumber. They can be made to taper gradually for use with a variety of furbearers or may be broader if used for beaver exclusively. Fleshing tools are available from trapper supply houses or a 10 to 12 inch carpenter's draw knife can be used.
Place the center of the back of the beaver pelt on the point of the fleshing beam (Figure 12). A towel or rag can be placed between the chest of the individual fleshing and the point of the beam to help hold the pelt in place. Starting from the tip of the beam, a swath of muscle and fat 1 to 3 inches wide should be cut from the center of the back down to the tail. The blade should be held at an angle so that the beveled surface is held almost parallel with the fleshing beam. Push the blade downwards and sideways to produce a slicing action. The pelt should be moved up frequently so all cutting is done near the pointed end of the fleshing beam. The pelt is then turned and a similar swath is removed from the center of the back to the nose and out to each side. Each quarter of the unfleshed pelt should then be fleshed clean. Care should be taken when fleshing the thin belly area and around the leg holes to avoid cutting the pelt. The fat tissue in these areas usually can be pushed away rather than cutting as is required for the back where thick fat and muscle tissue must be sliced away.

Figure 12. The beaver pelt is fleshed clean with downward slicing strokes of the fleshing tool starting from the center of the pelt.
Stretching and Drying Pelts (Figure 13)
Procedures used for stretching and drying beaver pelts vary with different trappers. The procedures described here have worked well in the past and require a minimum purchase of specialized equipment and materials.
After the pelt is fleshed and the fur has been allowed to dry, it is ready to be stretched. All that is needed is a 3 foot square sheet of 1/2 inch or thicker plywood, a ruler, nails and a hammer.
The pelt is hung up by the nose and measured from top to bottom. This distance plus half this distance plus 2 inches, totaled and divided by 2 should give you the diameter of the circle into which the pelt should stretch. An example is given below:
| Pelt length | = | 30 | inches | |
| + | 15 | inches | (1/2 pelt length) |
| = | 45 | inches | |
| + | 2 | inches | |
| = | 47 | inches | |
| ÷ | 2 | | (divided by) |
| = | 23.5 | inches | |
| | | | (diameter of circle) |
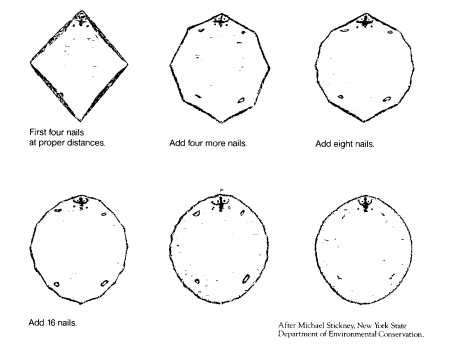
A circle of this diameter can be drawn on the board and the 12, 3, 6 and 9 o'clock positions marked to provide a reference point for the first four nails. The pelt is then laid on the board fur side down and the nose and center of the tail nailed along the circle at the 12 and 6 o'clock positions. The sides are then nailed at the 3 and 9 o'clock positions. The skin should be pulled and nailed at points midway between these and other nails until nails are spaced at approximately one inch intervals completely around the pelt. Any fat left around the leg holes should be removed and the leg holes closed up with 3 or 4 nails. The stretched pelt should be further scraped of any remaining fat with a curved knife blade or similar tool. Drying boards should be placed on end in a cool dry area at least 6 inches apart. Under favorable drying conditions, the skins should be dry enough to remove from the boards within 7 to 10 days. Drying time can be reduced to as little as 2 days if fans and artificial heat are used. Heaters should be used only to dry the air under humid conditions. Excessive heat and direct sunlight should be avoided to prevent pelt damage.

Figure 13. Beaver pelts should be switched into a circle when nailed to the drying board
Labels: Tanner


0 Comments:
Post a Comment
Subscribe to Post Comments [Atom]
<< Home